I recently worked with a couple of younger, temporary assistants on some outdoor photo shoots. They both enjoyed it and learned a lot, and both asked the same question: "How do you figure out how to balance flash and outdoor light so quickly?" Since this topic seems to be mysterious to a fair number of photographers, I thought it would be a good topic for an article.
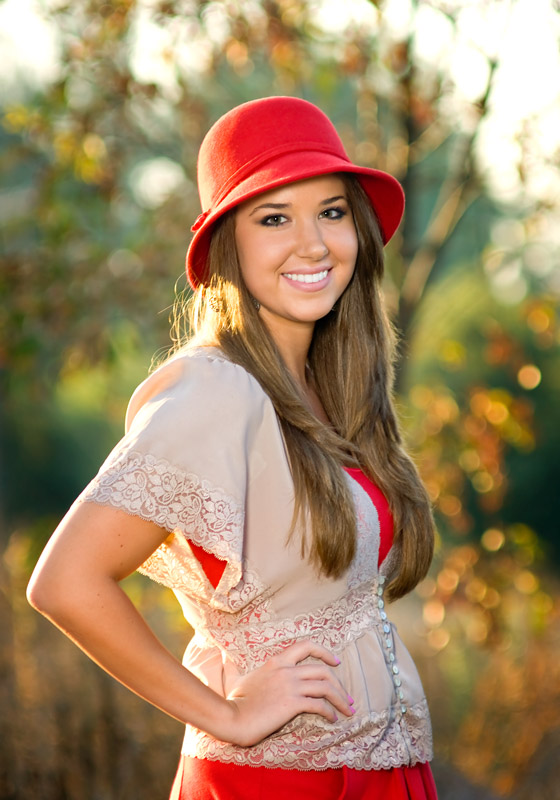
The image above is a typical outdoor shot, using the sun as a back or "rim" light, with flash used to fill in the shadow side of the subject. To figure out our exposure in terms of shutter speed, aperture, and flash power, we need to know three things: the light level for the lit background, the light level for the shadowed side of the subject, and how powerful our flash is at certain distances. Knowing those three things, we can come up with a shutter speed, aperture, and flash power level that will give us the overall photo we want.

Let's start with the last one first -- flash power level. The easiest way to know this is to do some work ahead of time, to make a "cheat sheet" we can refer to when we're in the field. The image above is my "cheat sheet" for my most commonly used speedlights. The way to come up with the cheat sheet is simple: set up your flash in a room with little or no ambient light, put the flash a certain distance from a chosen subject (I usually use 4 feet), and then take some shots at varying aperture values on the camera to see which one gives "proper" exposure. Notice on the cheat sheet above that I usually use the 1/2 power level setting on my flash -- that's just for convenience, and you can easily figure a new aperture for full power by going one stop higher (more closed aperture) for full power, one stop less (more open aperture) for 1/4 power, etc. Do these tests once at ISO 100, write down the results, and you can use your cheat sheet to calculate a good starting flash power setting for any aperture, ISO, and distance to subject. Notice also that I have both a "direct" exposure value (straight-on flash), and an exposure value for the same flash into a 42" shoot-through umbrella light modifier. That's all the information we need right now for our flash. You can use your flash's guide number to calculate these, but real tests with *your* speedlight will give you better results.

Next, we need the exposure values for the lit background, and the shadowed "ambient" light. In the image above, I showed the areas I used to meter those two values, using the "spot" meter function on my DSLR. We'll use those values to figure our final exposure.
So to put it all together, the process works like this: First, I decide on an aperture value I want to use, which is usually determined by the depth of field I want in a photo. In this case, I wanted a fairly shallow depth of field, so I decided to use f/4 on the 135mm lens I was using for this shot. That chosen aperture will be the basis for the rest of our quick calculations.
With the aperture chosen, meter the "background" area outlined in the image above, in manual mode on your camera, with your chose aperture value set and your chosen ISO value set (in this case, I used ISO 200). Doing so for this shot gave a reading of 1/200th at f/4. Make a note of that value. Then meter the "ambient" area shown in the image above, and record that value. Again, for this image I got a reading of 1/30th at f/4, about 3 stops less than the background meter reading (remember, doubling or halving the shutter speed is one "stop" less or more of light). That means if I want the subject's shadowed side to be the same brightness as the sunlit background, I need to add about 3 stops of light from my flash.
Looking at my cheat sheet for the Sigma EF500 flash I was using here, through a shoot-through umbrella, at a four-foot distance at ISO 100 I would normally use f/5.6 (one stop above where I want to shoot) for a correct exposure. Since I'm at ISO 200, that would change to f/8 (using a higher ISO means stopping down one f-stop on the aperture). I want proper exposure at f/4, not f/8...since f/4 is two stops *less* than the f/8 I'd get with the flash at 1/2 power, I need to turn the flash power down two stops from there. So setting the flash at 1/8th power will give me good exposure at f/4 from four feet away. And that's all there is to it. The final shot was made at ISO 200, 1/200th sec. at f/4, with the flash actually about 5 feet from the subject, going through a 42" shoot-through umbrella. Moving the flash back one foot made the flash exposure just a bit less than the background, which gave a more balanced shot. But four feet would have been just fine, too. The final result, again, is below -- nicely lit background, bright "rim" sunlight, and well-balanced and soft flash exposure.

Remember that when using your flash outdoors, as long as you're using a shutter speed *lower* than your camera's flash sync speed, changing the shutter speed won't affect the flash exposure at all -- your flash dumps out all of its light while the shutter is open, whether it's open for 1/200th of a second or 1/30th of a second. Changing the aperture *will* change the flash exposure, though -- so the idea is that you use the shutter speed to control the background exposure, and the aperture (or flash power and distance) to control the flash exposure.
With a little practice, it will become second nature to do the little bit of calculation you need to get a good starting point for these sorts of setups, and you can then tweak a little bit from there to get the light balance just right. Just pick a working aperture, meter your background and subject to find the number of stops difference between the two, then add flash to make up that amount of difference. Quick and easy...especially if you've taken the time to get to know your flash exposures ahead of time, and written them down! Give it a try.
Paul, You going to be blogging anything soon? I know you're probably knee deep in photo shoots. Just miss reading your blogs. :D
ReplyDeleteSharna,
ReplyDeleteI just did so. "Senior Portrait season" was crazy busy this year (a good thing!), I was so busy I was doing 14 hour days 7 days a week to keep up, and blogging took a back seat. Thanks for missing me, though! Really!
Paul
Paul,
ReplyDeletevery nice article, but I have one question:
why do you measure the difference between "background" and "ambient" if you are not using that value anywhere later?
If you take your cheat sheet and change values accordingly to your shooting settings, you will get 1/8th of a power no matter the difference in exposure between shadow and sunlit sides:
1/2 at ISO 100, F5.6
1/4 at ISO 200, F5.6
1/8 at ISO 200, F4
Regards,
Evaldas
Great article
ReplyDeletegoruntulu show
ReplyDeleteücretli
4FXWZV
görüntülü show
ReplyDeleteücretlishow
YV1B
Adding a light post for yard spaces not only enhances safety but also creates a warm, inviting atmosphere. Whether you choose classic designs or modern solar-powered options, these fixtures are perfect for illuminating pathways, gardens, or driveways. A well-placed light post can elevate the overall aesthetic, blending functionality with elegance to transform your yard into a cozy, well-lit retreat.
ReplyDeleteGreat explanation on how to quickly calculate outdoor flash/fill exposures without overcomplicating the process. I especially liked the practical tips that photographers can apply immediately in real-world lighting conditions. Understanding exposure balance is essential for consistent results, just as having an accurate Cyber Risk Estimate is important for managing digital threats. Thanks for sharing such a clear and useful guide!
ReplyDeleteGreat explanation on how to quickly calculate outdoor flash and fill exposures without getting lost in complicated settings. I especially liked the practical approach, which makes it much easier for photographers to achieve balanced lighting in real-world conditions. The tips shared here can save a lot of trial and error in the field. Interestingly, the same kind of precision and planning is valuable when using a Revenue Loss Estimator to make informed business decisions.
ReplyDelete